Thursday, April 18, 2013

It's been a while...

It's been a while since I was here blogging about my creations!  I have had a very busy year!  My youngest son broke his leg, had another bout of Kawasaki Disease and had his tonsils & adenoids removed.  My middle son had Scarlet Fever and, thankfully my oldest son has been well, but very busy with his love of kart racing!  I took up running and completed a half marathon raising funds for the Kawasaki Disease Foundation Australia, who do a great job being proactive about raising awareness of KD.

Recently I mashed together some photos of Quinn when he had KD, to demonstrate what he went through and the signs and symptoms.  I also put together some photos of him recovering to show how long it took for him to start looking himself again, as well as a comparison of Kawasaki Disease and Scarlet Fever rashes that two of my children have had.  KD and SF have some similar symptoms and SF is one of the illnesses that was ruled out when the specialists were going through their diagnostic criteria for KD.  I posted these images on a facebook page I am a member of but thought I would share them here as well.


Monday, March 12, 2012

It's a 4th Birthday Volcano Cake!

Well, I have been a bit preoccupied with life in general and thought it was about time I put up some pics from my middle son's 4th birthday back in December!!

The cake was made in a bit of a rush due to our youngest son being ill, but it turned out great! Khodi asked me to make him a volcano cake with his toy dinosaurs on it. I had made one for our older son previously so had an idea of how I was going to make it but wanted it to be different as well. I baked two cakes - one in a round tin and another in a pyrex bowl. I sandwiched them together with chocolate icing and cut out some of the top of the volcano and filled it with M&M's which Khodi thought was great! I added rice bubbles into the chocolate icing mix for the volcano texture and the sparklers added flair to it while everyone sang Happy Birthday!

Each of my boys also now have their very own cake server/cutter, engraved with their name and date of birth. A special keepsake gift that I hope will last forever, and that they will be able to use at each and everyone of their birthdays!

Photobucket

Saturday, December 24, 2011

Kawasaki Disease - a week in hospital

My last post was about our youngest son turning 1yo and what a fantastic milestone it was!
Since then our middle child has turned 4yo, however our youngest became ill and has spent the past 6 days in hospital, being discharged today just in time for us all to celebrate Christmas together!

He came down with a rash and fever, then stopped eating and drinking so we took him to our local GP who suspected pneumonia and prescribed antibiotics. His condition deteriorated during the day so we presented to the local hospital's ER only to be sent home with advice that he had a virus and to treat it with pain relief. He did not get any better so we returned to the hospital ER a few days later when he deteriorated even further, he was then admitted to the children's ward. He was very sick and his first night in hospital saw the nursing staff calling a medical emergency and he was almost placed in intensive care. It was very frightening to see him so sick, we had been lucky that none of our children had needed hospital admissions previously.

After being placed on an IV drip for fluids to help rehydrate him and penicillin to assist with any infection, he underwent a number of tests to rule out several possible illnesses. With the elimination of other illnesses and the presentation of his symptoms, his diagnosis came back as Kawasaki Disease. Appropriate treatment was started and within 2 days he was a lot better and amazingly, well enough to go home! That day was today, Christmas Eve!

We were not previously familiar with Kawasaki Disease, though are now more informed as a result of this experience. The symptoms of Kawasaki Disease, taken from the Royal Children's Hospital factsheet are:

Signs and symptoms

The disease usually begins with a high fever (over 39 degrees Celcius) which continues for at least 5 days.

Many, but not all, children also develop other symptoms such as:

  • Large, swollen glands in the neck
  • A rash (that often peels later on in the illness)
  • Red shiny or dry cracked lips
  • Red, lumpy (strawberry looking) tongue
  • Red eyes (conjunctivitis) without discharge
  • Swollen / red hands or feet
  • An unusual nappy rash
  • Joint pains
  • Extreme irritability (especially in young children)

Other diseases can be confused with Kawasaki disease. They may require different treatment.

The most important part of Kawasaki disease is that it may cause inflammation of the arteries that supply blood to the heart. This occurs in about 25% of patients if they do not receive treatment.


For further information on Kawasaki Disease please click on any of these links:
Royal Children's Hospital, Melbourne Australia
Westmead Children's Hospital, Sydney Australia
HeatKids Australia
Kawasaki Disease Foundation Australia
PubMed Health USA
Kawasaki Disease Foundation USA
Kawasaki Disease Canada


We are very lucky to have our son home for Christmas, we know that many other families are not as fortunate.

Photobucket

Sunday, November 27, 2011

Now he is 1!!

Wow, my youngest son Quinn has recently turned 1yo, what a fabulous milestone!

We celebrated his actual birthday with a low key evening with just my husband and our three boys, with my grandparents popping by in the afternoon as they couldn't make it to his birthday party. I decorated our house with a bright and colourful bunting, which I had made earlier in the week. We filled the kid's playroom with balloons which Quinn just loved. I made an Easy Banana Cake in a loaf tin, which tasted just divine, so light and fluffy, a big hit in our house. For perfection with cutting the cake, we gave Quinn an engraved Laguoile cake knife for his birthday which we hope will last all of his birthdays to come!

A few days later we had a birthday bash with many of our extended family and friends joining us to celebrate Quinn's 1st birthday! I had decided to make a number 1 cake for his birthday party as I had done the same shape for our older boys, the only thing I needed to work out was how to decorate it. Our eldest had a race track theme, our middle son had a train track, so my husband thought it would be great to have aeroplanes! I did a bit of thinking and googling for some inspiration and ended up coming up with an idea which I drafted out in Photoshop first and then kept my fingers crossed that it would turn out ok on the actual cake!

The birthday party cake was a White Chocolate Mud Cake recipe from Nigella Lawson. It tasted delicious but boy oh boy did it take a long time to cook! As I was making a very large cake using 3-4 times the amount of ingredients, it took well over 3hrs to cook in our dodgy little oven! I decided to attempt my second ever fondant cake and because I like a challenge I thought I'd try my luck at marshmallow fondant too, as an extra layer under the blue fondant just in case I mucked up the blue fondant it would be easy enough to take off and try again. I know I could have used ready made white fondant or royal icing but where's the fun in that! So the layering went like this 1) Cake 2) White Choc Ganache 3) Marshmallow Fondant and 5) Blue Fondant (pre coloured from a local cake supply store). After colouring some fondant for the shapes and font, I cut out the aeroplanes, clouds, letters and grass by hand. All up it was a much more time consuming process than I had anticipated but I was really happy with the end result and everyone loved it!

Photobucket

Sunday, October 2, 2011

Everyone loves a happy ending!

A great fairytale always has a happy ending, right?

One of the themes during 3rd term of school for my eldest son was fairytales. One of their tasks during the year was to write their own fairytale, with the help of their buddy. Corbin was proud to tell me when he completed his story, keen to let me know that it ended in the 'baddies' winning. My memories of fairytales were the likes of Cinderella, Snow White, Hansel and Gretel, The Little Match Girl, Thumbelina, Pinocchio and Puss In Boots. I thought fairytales always had a happy ending and told him I was surprised that the baddies won. My son is very clever and matter-of-factly told me "mum, it was a happy ending, for the baddies"!!

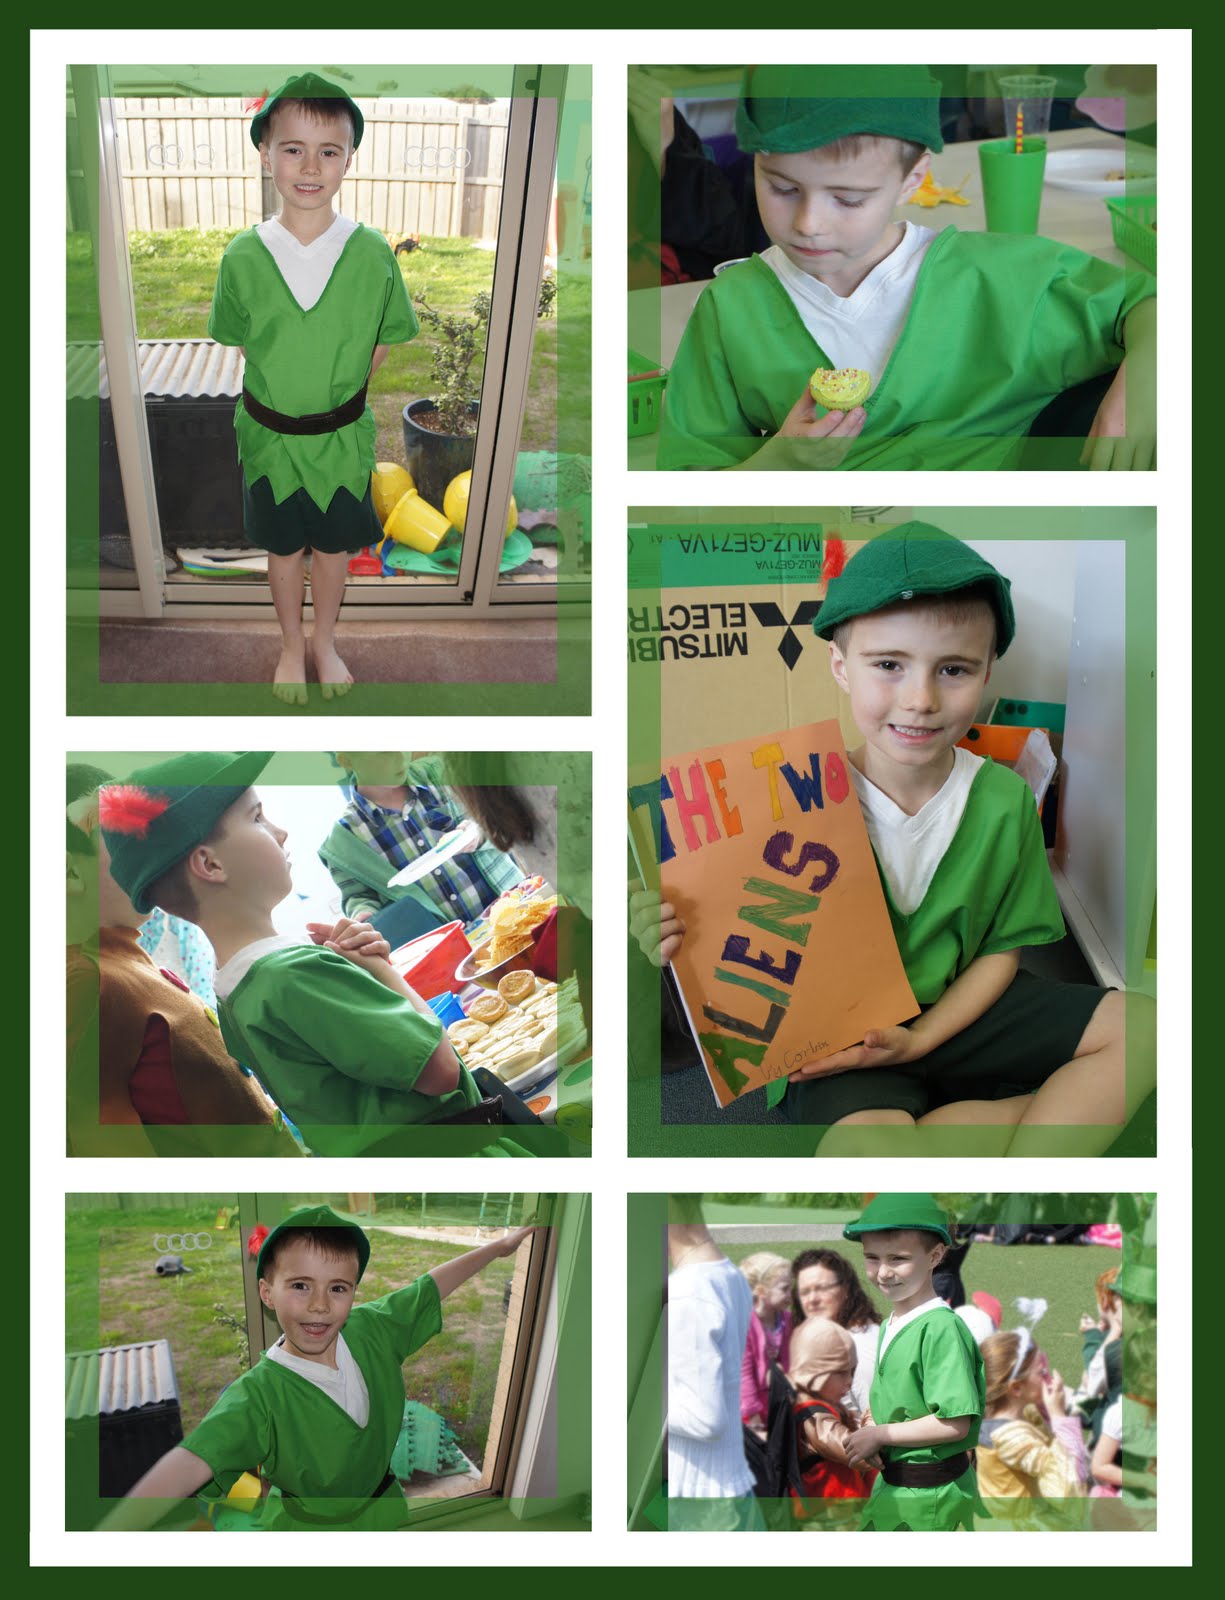
To mark the end of the fairytale term, their grade had a dress up day and parade. Corbin was keen to go as Peter Pan, though he was not keen on wearing tights! We didn't have a Peter Pan costume at home so I set about making something. I browsed the web for some images and tutes and came across make it and love it which had a tute for a toddler's Peter Pan costume. It was easy to follow so I used it as a guide.

The top - I headed to Spotlight and they didn't have any suitable green fleece so I bought some green cotton fabric, cut it to size using one of my son's t-shirts for sizing, leaving extra length at the bottom. I made some bias out of the same fabric and sewed the bias onto the neckline. First time making my own bias too!!
The hat - I bought some woollen felt which I made the hat from and sewed in a red feather. The only thing I would do differently is use a coordinating colour thread in the overlocker, as you can see the white thread under the tip of the hat at the front, but I didn't have time to change the thread over so just left it white.
The belt - I had some brown courdory left over from a previous project already so I cut it into a long strip, sewed it up and then added a couple of snaps for closure.
The pants - As my son didn't want to wear tights, I made a pair of midlength shorts for him out of bottle green fleece. I figured that he would get more use out of them seeing that his uniform is bottle green pants. Shorts were a bit of a fail, they looked ok, but my son said they were really uncomfortable, so we scrapped that idea and at the last minute we cut off a pair of his old school tracksuit pants that had a big hole in the knee and made some cut off shorts which ended up working really well with the costume!

I think it turned out pretty good!

Photobucket

Saturday, September 24, 2011

Happy 7th Birthday!

Recently it was my oldest son's 7th birthday and on the day we celebrated with a Freddo Frog ice cream cake, yum! His birthday party cake was however a bit more of a challenge than a straight-out-of-the-box-frozen-cake variety. This year he had a party at our local Timezone with his friends and his cake request was for a Star Wars Lightsaber! I have always wanted to try and make a cake using fondant icing and I thought I would finally give it a shot!

I was not quite sure how I would manage to make a cake in the shape of a lightsaber, my first ideas were to make either a square or rectangular shaped cake and cut it down to a shape resembling a lightsaber, though I was a bit apprehensive about getting it right! I decided that I really didn't have the time to fluff about trying to back and cut cakes to fit, so I thought I'd firstly give it a go with a premade jam roll cake from the supermarket.

To make the shape of the blue laser sword part of the lightsaber, I joined three mini jam rolls together in a long line using white chocolate ganache and then cut down one end so that it was curved rather than flat. I used the white chocolate ganache to cover the mini jam rolls and let it set in the fridge over night. I coloured some white fondant icing with blue colouring, rolled it out and then covered the sword section with it. There were a few cracks in the fondant when I did this but overall I was happy with it.

For the lightsaber handle I used a large jam roll and cut out a section where it would fit over the end of the blue lightsaber section. To cover the handle, I mixed in a small amount of black fondant with some white fondant to make a light grey shade, however it ended up being a bit of a purple colour instead. Just for my own curiosity to compare the difference in using chocolate ganache and butter cream under fondant, I covered the jam roll for the handle with butter cream icing and let it set in the fridge. I then covered this with the 'grey' fondant icing and joined the handle section to the rest of the lightsaber. I then rolled out some black fondant and cut to shape to stick on top of the handle, scoring it with the back of a fork to make the lines. I also cut out a circle of black fondant icing to put on the end of the handle. I finished off the cake with a large fruit tingle for the button on the handle and some blue glittery ready made gel icing around the laser section of the sword to give it a 'glowing effect.

I only have one cake board at home, and given that it is square, it was looking a bit bare with only the lightsaber sitting in the middle of it, so I piped on the happy birthday message in a 'Star Wars' font! I also made some candle holders out of left over black fondant. Overall result is not perfect, but for my first attempt at a fondant cake I was super impressed with how it turned out, as were the kids! I am pretty proud of my effort!


Inspiration for the lightsaber cake came from a google image search where I found these cakes here, here and here! Funnily enough, one of the lightsaber cakes I found was obviously made for a boy with the same name as our own!
Photobucket

Wednesday, August 17, 2011

My first pair of pants!


Well not really my first pair of pants but the first pair of pants I have made! Two pairs actually!

I had bought this camo print cotton fabric recently from Lincraft and my oldest son (almost 7yo) asked me if I could make him a pair of pants and a vest out of it. That wasn't my intended use for the fabric but it didn't matter. He wanted them to wear to a birthday party. Now I had never even attempted to make a pair of pants before so trawled the net for a free pattern and came across the KID Pants at dana-made-it.com

I decided that as the camo print fabric was quite thin that I would either need to reinforce the bottom and knee areas or line the inside of the pants. I had some light tan coloured tracksuit fleece already so decided it would be perfect! So the night before the birthday party I got to work. The KID Pant pattern is a sz3-4 so I knew I needed to increase the pattern size. I estimated how much extra to add both in width and length and hoped that it would work out ok. I really should have just gone and measured my son while he was sleeping but I didn't want to disturb him, or I could have used another pair of his pants as a guide for size but I didn't think of that at the time! I didn't quite get them finished before I went to bed but managed to finish them the following day and as I had put the fleece lining in them I made them so that they can be folded up at the bottom (really just in case they were too long!). I didn't get around to making his request of matching vest, though he was happy enough with the pants. I also made another pair of pants the same for my 3.5yo son.

I am pretty happy with the end result, especially as they are the first pair(s) of pants I have ever made, and more importantly that they fit!

Photobucket

Melbourne Craft & Quilt Fair

Over the weekend of July 28-31 the Craft & Quilt Fair came to Melbourne! I managed to squeeze in a trip there on the Sunday afternoon with my lovely Mum for company. We both had an enjoyable afternoon at the fair and I came home with some bits and pieces from various stores including some gorgeous ribbons and some fabric in kids prints. Next time I go to the fair I will make sure I have the whole day free as an afternoon just wasn't enough time!


Photobucket

Saturday, June 18, 2011

The babies are here!

Today I heard from both of my friends Kristy and Rach! Anticipation is over and Rach gave birth to a baby girl yesterday and Kristy to a baby boy today! Super excited for both of them and their families!
Photobucket

Thursday, June 16, 2011

Newborn nappy stash order completed!

With only a few days to spare, I finally finished the order for my gorgeous friend Kristy! Awaiting to cover her newborn's bott is a stash of funky coloured fitted nappies and covers.
As Kristy is eagerly awaiting the birth of her baby to find out the gender, she selected some fun solid coloured flannelette fabric from Spotlight. I added in some gender neutral jungle print flannelette, also from Spotlight. The inner layer of the nappies are made from scrumptiously soft vanilla suedecloth fabric from one of my favourite nappy fabric stores, which I have mentioned before, Nappies Covered. As it is winter, a quick dry fitted nappy was required and therefore there is no added sewn in hidden layer of absorbency in these nappies. Instead there is a two layered bamboo snap in booster folded in half and an additional 2 layered bamboo snap in mini booster, providing 6 layers of bamboo plus a layer of flanellete for absorbency. All nappies have been made with snap closure and I used a variety of coloured snaps to complete them.


As every fitted nappy requires a cover, Kristy's stash has just that! Fitted nappies and covers are great for the newborn stage as they are awesome at keeping in all those pooplosions! There are less covers than nappies as the covers can be used several times before needing a wash, unless soiled. The covers have been made from a selection of solid coloured PUL including sage and aqua, and one cover is made from giraffe print cotton PUL fabric. Edging the nappies is super soft fold over elastic (FOE) in either solid colours of purple or white, or patterned with fish or turtle friends. All fabric for the covers was sourced from Nappies Covered.


Kristy newborn stash comprises of 15 fitted nappies and 7 covers.


While I was busy sewing Kristy's stash, I decided to make a gift for another lovely friend of mine, Rach, who is also due to give birth to her 2nd bub any day now! Rach and I have been getting together as sewing buddies lately, it's been lots of fun! I made a newborn fitted nappy with jungle print flannelette and lined with a blue fleece inner for the stay dry layer. To match the jungle print, I made a cover from giraffe print cotton PUL and white FOE. I think these are super cute! Rach has also been busy sewing some newborn nappies from my pattern, and I can't wait to see what she has finished!


Now I wait in anticipation on the news of two babies that are due to enter the world any day now!
Photobucket

Thursday, June 2, 2011

A medical delay!

I had been busy sewing away some nappies for my gorgeous girlfriend who is due in only a couple of weeks now, however a spanner was thrown in the works and after 7 hours of excruciating abdominal pain I was taken off to hospital in an ambulance on Friday night! It turned out that the ambulance ride was well warranted, and I was diagnosed with pancreatitis and subsequently had to remain in hospital until my gallbladder was removed, gall stones being the culprit behind the pancreatitis. Lucky for me the medical team wanted to operate as soon as possible so that I wouldn't be subjected to further attacks of pancreatitis or worse, so I didn't have to go on a long waiting list for the surgery. I am home now and recovering well :)
Photobucket

Wednesday, April 27, 2011

Happy Easter!!

OK, so I'm a few days late, but we were away over the Easter weekend and I didn't get a chance to post anything prior! We had a quiet Easter, choosing to spend it with family and I made some yummy chocolate eggs for the occasion with the help of my middle son!
Photobucket

Tuesday, April 19, 2011

My first orders!

Here they are: two sets of ribbon cuddle blankets with matching large blankets, and an individual ribbon cuddle blanket. All have been complemented with personalised name tags.

Photobucket

Monday, April 18, 2011

Toyworld Lego competition


My boys are Lego mad! They have oodles and oodles of Lego! My eldest receives the Lego club magazine and the latest edition had some information about a Lego Competetion being run by Toyworld stores. Entrants have to build the Lego model of their dreams, take a photo of their creation and then take the photo in to their local Toyworld. So here he is with his building and creative skills, which he has called "Jay's Ninja Battle Tank". Lego Ninjago is one of the latest Lego sets to hit the market which he absolutely loves and where he got his inspiration from! We will head back to Tates Toyworld later in the month to look at his and all the other entrant's photos on display!

So if you have Lego crazed kids, get them to get their creative hats on and get building!
Photobucket

Monday, April 11, 2011

More Ribbon Blankee's


I met up with a number of lovely friends recently, they each had a little one around the same age as my youngest.

I had already given a ribbon blankee to all the babies except for one, so I made this one, for a little princess, the night before our get together.

Gorgeous mushroom print cotton fabric on one side, lovely soft heart fleece on the other side, and an assortment of contrasting ribbons.


Photobucket

A WAHM business on the way perhaps?

Over the last few years I have found a lot of joy in making and sewing different items. I have often wondered "do I have the skill and talent to make something more of this" both in a creative and business sense?

I hadn't felt ready to take such a plunge, however since the birth of my third son I have been working toward this new business venture. I have had a lot of encouragement from family and friends toward me starting my own small business in this area, and positive feedback from others about the items I have made.

Initially I plan to start with a manageable level of stock and also accept custom orders.

Watch this space for further details...

Photobucket

Tuesday, March 22, 2011

Home made Mei Tai stlye baby carrier


So after lots of discussion with some fellow baby wearers, I decided to try my luck at making a Mei Tai style baby carrier. I trawled the internet in search of a pattern but of course each site I looked at all gave different measurements! So as per my usual way of making things and with an image in my head, I made up a pattern of how I thought it should work.

I needed some fabric first, so I dragged my patient husband to Spotlight in search of some suitable fabric for the body of the carrier. I was thinking along the lines of denim and was super lucky to find some denim fabric in the clearance section, bargain! For the waist band and shoulder straps I used some dark brown corduroy that I had at home left over from a cowboy vest I made for a friend's son a while ago. I padded the waist & hip area with polar fleece, as well as the shoulder area. Cut the denim fabric to shape including a hood and then sewed it all together.

I was very happy with the finished product and have received a lot of positive comments on it! I have even had people come up to me and ask me where I bought it from! I still have to sew some tabs onto the shoulder straps so I can attach the hood but it's finished otherwise! I have been using it almost daily, it is super comfy and I just love it!
Photobucket

Friday, March 18, 2011

St Patrick's Day!

St Patrick's day was yesterday, you know where they celebrate all things Irish and drink Guinness and green beer. It's lots of fun, though I didn't head out to the pub yesterday I did have a great time mucking about with my kids and having lots of fun in our "Irish" hats.

7 years ago I was holidaying in Dublin with my husband. It was a childhood dream of mine to one day spend St Patrick's day in Dublin, and that I got to do! I was then pregnant with our first child and we brought the hats back with us from that holiday! They have since come out for every St Pat's day since.


Photobucket

Medium Nappies!

So I finally started and finished one medium AI2 nappy woot woot! I purchased the blue hibiscus print poly PUL fabric from Nappies Covered a couple of months ago but hadn't had the time to start working with it until now. It is such a summery print that I wanted to have it made for summer but Autumn will have to do!

I love the poly PUL for a nappy as the stretch in the fabric helps to make for easy nappy changes and a good fit too. The inner of the nappy is stay dry white suedecloth and there are two snap in foldable 2 layered bamboo bosters for absorbency, giving 8 layers of absorbency.


I have made some medium nappies before this one, quite a while ago now, and I made them with hook & loop, though I now prefer to use snaps on the nappies. I decided to alter my original medium nappy pattern which I made myself, making a few changes to accommodate the snaps, inlcuidng shortening the front and back wings. I thought that would be easy enough but I am not 100% happy with it so I need to tweak it a bit more before I sew the next one as the sides are too low on the front panel and it doesn't sit right. Hard to tell from the pics but I know that's how it is and, as I'm a bit of a perfectionist at times, I need to change it on the next nappy I make!


On another nappy related note, a girlfriend of mine is due to have her second child early June and she has asked me to make her a stash of nappies! I am very excited to be making some for her baby and feel very priviledged that she asked me!
Photobucket

Sunday, February 27, 2011

A Boys Bunting

My latest sewing project was something to add to the bare walls of my 6yo & 3yo sons' bedroom. With their input we decided on a bunting.

I headed down to Spotlight while they were at school and daycare and bought some different printed and plain cotton fabric. They were pretty excited about the boyish prints I found - cars, trains, camo, space, robots.

I soon got to work cutting out triangles of fabric and then the time came to let the boys choose which triangles they wanted their bunting made from. My plan was to do a create a bunting alternating the prints and the plain colours but of course my boys only wanted the prints, so that's what I made!

I used bias binding to sew it together and once completed I attached it to some hooks in their room for a great effect! The next bunting I make I plan to use only one or two prints or a theme, such as space, and alternate with prints and plain colours but also make it a reversible bunting, so space on one side and cars or something else on the other.


Photobucket