
Friday, October 29, 2010

Babies Nappy Stash Finished!!

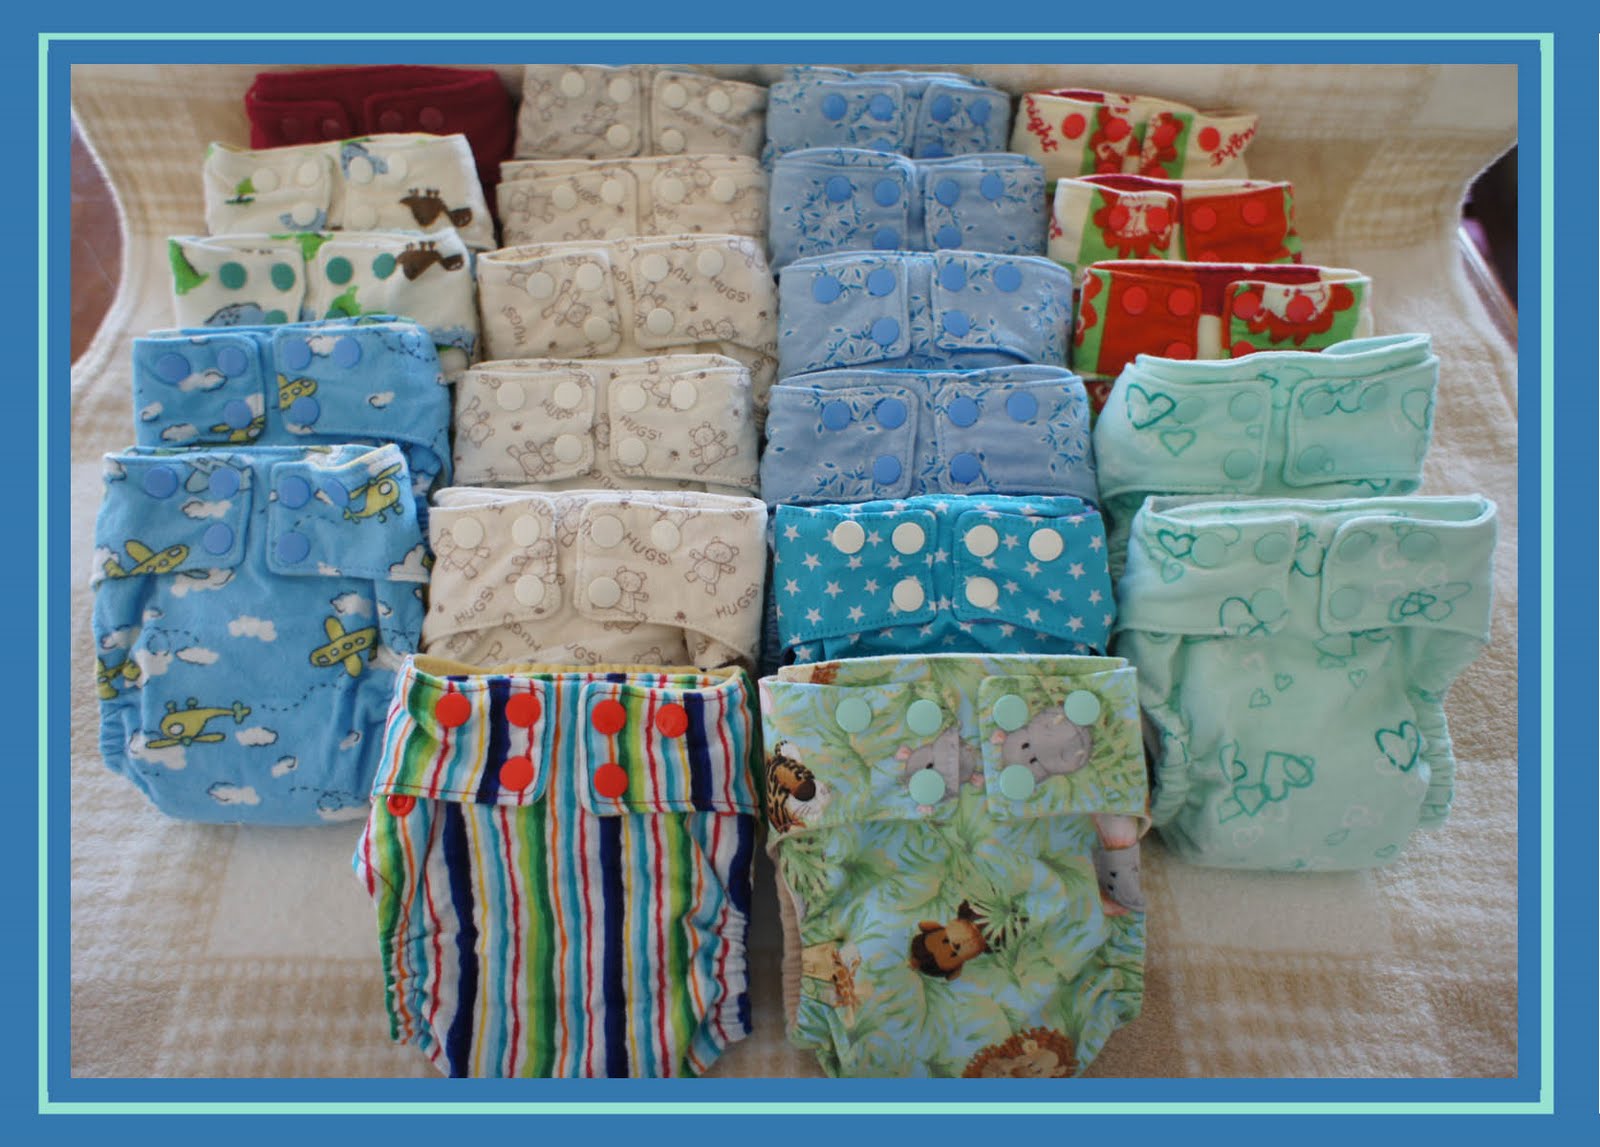
With just over a week till my due date, I have finally finished off the newborn and small nappy stash for this bubba!

This is the newborn stash - 16 x fitted nappies, plus 1 x AI2. They are tiny, so I am sure they will only last a few weeks!


Newborn covers. I am not 100% happy with them as I am not too great at sewing FOE but they will do. They look great from a distance but the zig zag stitching is a bit dodgy close up!


A comparison of a newborn & small AI2. The outer is a gorgeous PUL cotton print from, the inner is lined with suedecloth (both fabrics from Nappies Covered) and it has both a sewn in hidden bamboo booster and a snap in bamboo booster. I love this print and they would have to be my fav nappies so far!


This is the small stash - 21 x fitteds plus 1 x AI2. I made a couple of covers as well but haven't taken a pic yet.


I thought I would try and make a Christmas nappy as I had some red fleece that has been sitting in my cupboard for a while. It's an AI2, has a hidden layer of PUL, an inner of suedecloth, sewing in hidden bamboo booster and a snap in bamboo booster also topped with suedecloth. The Christmas tree on the back of the nappy is an iron on patch from Spotlight, though I have sewn it on to ensure that it stays in place! I was really happy with how this nappy turned out!


Photobucket

Friday, September 17, 2010

Indiana dress up outfit complete!


As it was our oldest son's 6th birthday yesterday he got the finishing touch for his Indiana dress up - a hat! He was thrilled. You can see in the pick the Indiana bag I ended up making for him too, it has an adjustable length strap.

Photobucket

Saturday, September 11, 2010

6th Birthday Party!

Our eldest son is turning 6yo during the week and today was his grand birthday party at a local Gymnastics Centre. He had a joint birthday party with one of his school friends who is also turning 6yo during the week, so there was a birthday girl and a birthday boy in the spotlight! The party was for 2hrs, the first hour was of fun on all of the different gym equipment, then a half hour break for food, then the last half hour on the BIG trampoline! We had to cater ourselves but as it was in the late afternoon we kept it very simple with fairy bread, chips, pre ordered pizza delivery for dinner, frog in a pond and birthday cake! All the kids had an awesome time and it's definitely a place I could recommend for a party!

Both birthday children were having their own special cake for the party. Our son had initially asked if I could make him a birthday cake of a rectangle with his toy dinosaurs on top, which then became a more elaborate request to include a volcano! I was very happy with the end result and most importantly our son loved it.


To make his birthday cake, I made two vanilla cakes, one in a square cake tin, which I used as the base of the cake. The second cake I baked in a Pyrex mixing bowl so I could get some height and slope for the volcano. I cut the second cake into the shape for the volcano and then placed that on top of the square cake toward the back, scooping out a little off the top of the volcano. Chocolate icing with rice bubbles mixed through gave the texture for the volcanic mountain. The lava was created from red & orange sparkling cake decorating gel purchased from Spotlight. I iced the remainder of the cake, as well as most of the exposed cake board with green icing for grass. I left a small area for the lake, which was made of blue icing surround be chocolate rocks that I purchased from the Nut Shack. I placed 3 Schleich dinosaurs on the cake, and sprinkled some more chocolate rocks on the cake at the base of the volcano. I randomly placed tress and small plastic dinosaurs on the green icing on the cake board, as well as more chocolate rocks and some crushed up Cadbury Flake. The writing was done using the same sparkling red gel that I used for the lava. There was just enough room for 6 candles at the front right of the cake, in front of the Triceratops, and I also stuck some sparklers into the centre of the volcano for further effect!

Photobucket

Wednesday, September 8, 2010

More Nappy Creations.

I have finally finished off the newborn nappies yay! Only 8 and a half weeks to go before I can try them out on our newborn! I have made 12 all up now, and I have even started on some small nappies too, just need to work out what size booster to put in the small nappies as I am not too sure. The outer fabric is either flannelette or cotton print, all from Spotlight. The Inner stay dry layer is suedecloth from Nappies Covered. The bamboo boosters are made from bamboo fleece from Snaps Australia, which is also where I purchased the snaps from.

Here are my finished newborn MCN's.

And the first of the 3 small nappies I have made, compared to the newborn ones for size.

Photobucket

Saturday, August 14, 2010

Indiana Vest take 2

The vest was a success and my son even took it to school for show and tell! He tells me that it's not a cowboy vest in reverse though, it is a Woody from Toy Story vest!

So yesterday I managed to make another vest for my youngest son, and I can't believe that I started and finished it in one day!! I changed the cuddlefleece to flannelette cowprint instead which made it a lot easier to sew. Now both boys want an Indy bag, so that is the next sewing project for me to whip up. I have never made a bag in my life so here's hoping I can make something up that will look half decent!

Here is a pic of the 2nd vest and my kids playing in their vests this morning, I thought the 2nd vest was going to turn out a bit bigger but it's a great fit on my little man. My guess is that it's about a size 3. They both worn them for most of the day today, even out to the shopping centre!


Photobucket

Thursday, August 12, 2010

Reversible play vest

It's coming up to my eldest son's 6th birthday and I thought I could make him an "Indiana Jones" dress up vest. Now I have never sewn much in the way of clothing - a dress in high school and an apron for each of my boys and that's about it! So I thought this would be a good challenge but also not too over the top and difficult. I didn't have a pattern so I just made one up, it is about a size 6.

I purchased some brown corduroy to make the vest out of, but then I had a thought that I could make a reversible vest, one side being cord for "Indiana" and the other side being a cow print for a "Cow Boy" vest, as I had some cow print cuddlefleece already. I used snaps for the closure at the front and I'm pretty happy with how it turned out. My son has already seen it partly finished and he has been pretty impressed so far so that's a good sign! I finished it tonight after he went to bed so he will be excited in the morning, an early b'day pressie for him how lucky!. He has told me that I will need to make him Indiana's bag to go with it though, so will wait and see what happens. I picked up a brown hat in a toy store last week so I will give him that to go with the vest but he can wait till his actual b'day for that one!


Now I will just have to make another one for my youngest son!

Photobucket

Saturday, July 31, 2010

Newborn nappies & Ribbon blankee

So I ended up buying a new overlocker to replace my mum's, as the motor had died *sigh* which is apparently not very common for a Janome overlocker! I could have had it repaired but as it was not much more to buy a new one I decided to just replace it.

After a few tests at sewing a newborn fitted nappy with snaps, I have finally tweaked my pattern to one I'm happy with. I have made a few testers that are now having good use on my boy's teddy bears, and I also made a PUL cover with fold over elastic which turned out much better than I anticipated as my last attempt at sewing a cover with FOE was not that great!


The fitted nappies have a flannel outer and suedecloth inner. The flannel is from Spotlight and the suedcloth from Nappies Covered. I love the suedecloth for it's trimness. I have sewn a two layer bamboo booster into the inner of the nappy and I will add a snap in bamboo booster as well. I am still yet to finish the snaps on one of the nappies. The cover is made from a polyester PUL and FOE both of which I purchased from Nappies Covered . The PUL is lovely and soft and stretchy.


I also thought I'd give making a ribbon blankee a go. I've never made one of these before and was hoping it wouldn't be too hard. All of the fabric and ribbon is from Spotlight and I am really happy with the result. The front side is a printed cotton and the reverse is a plush cuddlefleece. I hope our newborn will like it!


Photobucket

Sunday, July 4, 2010

Modern Cloth Nappies I have made!

Finally I have finished two Modern Cloth Nappies!! I made this pattern a couple of years ago after a lot of trial and error. I had made a few nappies back then but stopped for various reasons and now that we are expecting our 3rd bub I decided I better get cracking back into it (which is what I was referring to in an earlier post about life throwing a curve ball!!).

When I pulled out my sewing machine I found that parts of the cotton reel holder had disintegrated from age, but I was lucky enough to be able to get the parts from the local sewing machine store for only $10 and fix it myself! I borrowed my mum's overlocker and it seems that died on me yesterday so I am starting to think I am jinxed... hopefully it wont cost too much to repair.

Here are the two nappies I made:


The first nappy is a black/grey/red tartan fleece print, with hidden lay of PUL and an inner stay dry layer of red suedecloth. I used snaps for the closure on this one, and also for the booster to snap to the nappy shell. I have made two boosters. The first one has snaps on the back to attach to the nappy and also a stay dry layer of matching tartan fleece. The second booster is a bit narrower and can sit folded in half inside the other booster, or underneath it. Both boosters are made with 2 layers of black bamboo fleece. My 2.5yo modelled this nappy for me :)


The second nappy is made from a cotton print PUL and has an inner stay dry layer of purple suedecloth. I used hook & loop for the closure on this one, though I think I much prefer the snaps. I think I might also round the corners of the hook instead of having them square. This nappy also has a set of two boosters made with 2 layers of natural coloured bamboo fleece, one which can be attached to the nappy shell with snaps and is topped with suedecloth liner.


Photobucket

Monday, June 28, 2010

The bed head


I have finally made the bed head for our main bedroom and am very pleased with the result. We had a piece of timber in the garage which was the perfect size so I didn't need to purchase anything. I was contemplating what type of padding I would use and decided that getting a piece of foam cut to size from Clark Rubber was the way to go. I just didn't expect the cost to be high, so instead I chose a single bed size foam overlay which I only needed to cut down to size a fraction. I used spray adhesive to attach the foam to the timber, covered with fabric I had purchased from Spotlight, and used a staple gun to attach the fabric to the rear of the timber. Holes had been predrilled into the timber and screws placed into the wall so I could attach the bedhead directly to the wall.


Photobucket

Friday, April 16, 2010

Pumpkin Choc Orange Muffins

Yum Yum!!

Part of our dinner last night was mash pumpkin, potato & sweet potato. There were left overs and I wasn't going to use them for dinner tonight so oh what shall I do with them?

Then it hit me. When I was in secondary school we made some muffins that had mashed pumpkin in them. I remember them being yummy. I was sure I still had the recipe written down somewhere. Yep, I found it! Though I don't know where the recipe originated from. So this morning I used the left over mash (even though the recipe called for mashed pumpkin I used the mix of pumpkin, potato & sweet potato) and whipped up some muffins, and oh they are sooo fluffy and delicious! I also made some in mini loaf tins. I am going to freeze some of the muffins to use in my son's school lunches.


Pumpkin Choc Orange Muffins
120g butter
1/2 cup caster sugar
granted rind of 1 orange
1 egg, beaten
1 1/4 tbsp golden syrup
1/2-3/4 cup mashed pumpkin
1 1/2 cups SR flour, sifted
1/2 tsp bicarb soda, sifted
2 tbsp cocoa, sifted
1/4-1/2 cup orange juice

1. Cream butter, sugar and orange rind.
2. Beat in egg and golden syrup.
5. Mix in pumpkin.
6. Stir in half of the flour, cocoa & bicarb.
7. Stir in half of the orange juice.
8. Stir in the remaining half of the flour, cocoa and bicarb.
9. Stir in the remaining half of the orange juice.
10. Spoon into greased muffin tins and bake for 20mins in a 180deg preheated oven.
11. Cool on a wire rack then serve.
*Makes approx 12 muffins.

Photobucket

Toot Toot!

Yes, a train goes "Toot Toot"!

Quite some time ago, maybe even about 18 months ago, I was lucky enough to go to the Kaiser Craft outlet, where I found myself a little project to conquer. It was a Beyond The Page Train Tidy and I thought it would look great in my youngest son's room. Like lots of my other projects it sat hiding away amongst my "stuff".

This week I decided to jump on board the train and get moving! Here is the finished result which I am thoroughly proud of :)

TOOT TOOT!!!

Photobucket

Thursday, April 15, 2010

A Time Capsule

Buried deep in the ground was a large barrel filled with treasure. You couldn't get the barrel out as it was cemented into the ground! Who's could it be? What was the treasure? The lid became exposed, but could it be opened?

It all started 20 years ago. It was the year 1990. I don't recall who's idea it was, possibly my grandparents? My siblings, my parents, my cousins, my aunts, my uncles, my grandparents, and a couple of family friends all got together for the occasion.

The occasion was to start a family time capsule.

Everyone put something treasured in, whatever they wanted to as long as it fit in! Letters, wine, photos, coins, stamps, newspapers, predictions, anything! It was sealed up and buried in a backyard where only those that were in attendance new the location of the treasure. It was agreed that in 10yrs time we would all get together again for the opening. In the year 2000 we did just that and decided again that we would bury a new lot of treasure to open in the year 2010.

So on the weekend that is just what happened. My siblings, my parents, my cousins, my aunts, my uncles and my grandparents, all got together for the time capsule opening again. This time there were even more faces, with partners that have come into the family since the last opening, and not to mention the next generation of children!

It was funny watching everyone's faces, not everyone remembered what they had put in there 10 years ago so there were lots of surprises all round!

Everyone brought something they valued, all to be placed in the time capsule and sealed for another 10 years. Will we remember what we placed in there this time? We will find out in another 10 years!!

Photobucket

Sunday, April 11, 2010

Sandpit Project - completed at last!


After working interstate, hubby finally came home and put the canvas prints outside on the sandpit wall for me. Thanks hubby! So the final touches to the Sandpit Project have been completed!!

Photobucket

Friday, March 12, 2010

Canvas Outdoor Art

I have finally finished the outdoor art panels for our children's sandpit area.

My lovely husband and his friend made some wooden frames for me, three 1000mm x 500mm rectangle frames and three 500mm x 500mm square frames. The rectangle frames are for the sandpit wall and the square ones are for... I am not sure yet!

I covered each frame in some patterned canvas which I purchased from spotlight. I used a staple gun to hold it in place on the back of the frame. The fabric has been pulled really tight (well as tight as I can get it) so that it is firm across the frame, and then I sprayed the panels with some waterproof solution so that they will have a greater lifespan outdoors in the elements. They are currently in my garage drying. Next step is to hang them up on the sandpit wall that we painted blue, but I will wait till my hubby is able to help me and that wont be for a few weeks. So hopefully during the Easter school holidays the sandpit project will finally be FULLY complete!


Photobucket

Tuesday, March 2, 2010

When life throws a curve ball!

And that is what happened yesterday! I will be back another time to tell more :)

Aside from that my youngest has been sick with a high temp and cough and just generally miserable for over 5days now, I hope it passes soon.

I did get to spend some quality time with my eldest on the weekend making a big truck out of recycled boxes that we had collected. He did a great job!
Photobucket

Friday, February 26, 2010

Smashed in the face by a cricket bat, ouch!

Well, that was what happened to my son at after school care a couple of days ago! I arrived to find him sitting opposite the door with a bloodied piece of paper towel to his mouth. OMG I thought, trying to hide any negative reaction from him. He looked miserable enough already, I didn't need to make it any worse. It was an accident. I really felt sorry for his friend who happened to be the one yielding the bat, but hey accidents happen (friend had already gone home by the time I arrived) and no doubt my munchkin will be much more aware of where he is when a game of cricket is happening, at least far away from whoever has the bat! No broken nose, no browken jaw, and no teeth knocked out thank goodness. Just a big fat lip, a few small cuts and some lovely bruising. Phew! Panadol, jelly and ice cream seemed to help :)

The pic below was taken after we got home, it shows how miserable he was, but you can't really see the swelling or bruising, but I just loved how the sun was shining through the window on him.


So now it's my younger sons turn to lap up the attention. He ran a high temp all last night and is sick today, sleeping right now, dr's visit this arvo. Oh the excitement of parenting!
Photobucket

Tuesday, February 16, 2010

Proud Mummy Moment!

My son was very proud of himself today, as were we. He received a special Achievement Award from his teacher today. It was for getting along and being tolerant. He came out of his classroom beaming, very excited to show us his laminated A4 certificate. Well done, we are very proud of you!
Photobucket